These Christmas Tree Cakes are soft, sweet, and coated in creamy white chocolate with a hint of vanilla nostalgia. Perfect for gifting, sharing, or adding sparkle to your dessert table.
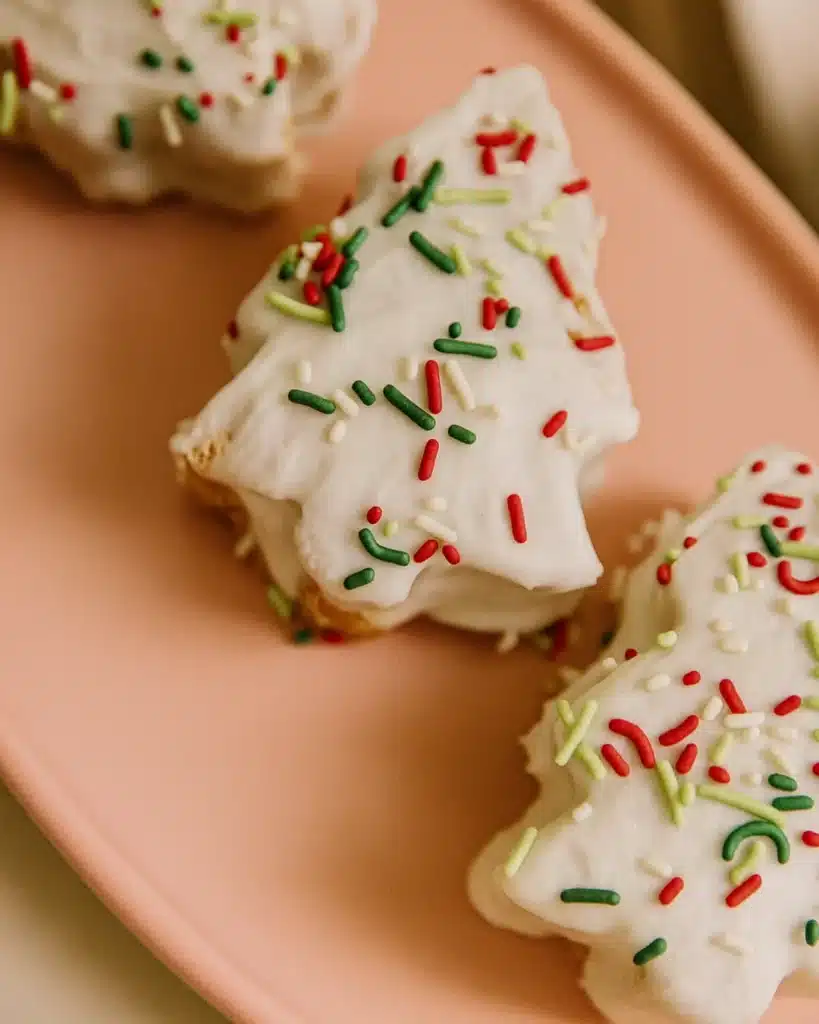
Table of Contents
Why You’ll Love These Christmas Tree Cakes
There’s something magical about Christmas Tree Cakes — and this homemade version makes that magic wholesome and allergen-friendly. You get the same nostalgic flavor as Little Debbie’s classic treat but made with real ingredients like almond flour, maple sugar, and coconut oil.
They’re gluten-free, dairy-free, and still melt-in-your-mouth soft with a creamy vanilla buttercream center. You can even make them ahead of time and store them in the fridge or freezer, saving you stress during the holidays.
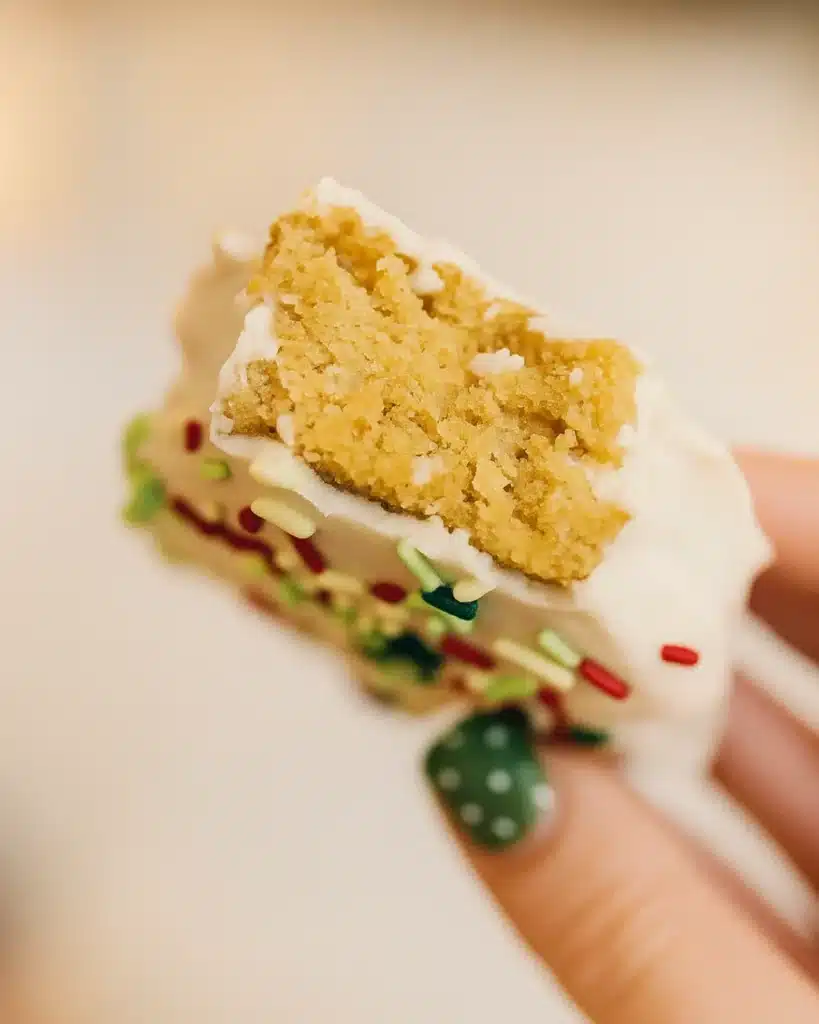
Plus, decorating them with colorful sprinkles makes this recipe fun for kids and adults alike. They’re a joy to bake, beautiful to gift, and impossible to resist.
Ingredients You’ll Need
For the Cake
You’ll need 3 large eggs, ½ cup maple sugar, ½ cup melted coconut oil, 2 teaspoons vanilla extract, ¼ cup almond milk, 1½ cups almond flour, ¼ cup tapioca starch, 1 teaspoon baking powder, ¼ teaspoon baking soda, and a pinch of sea salt.
Almond flour keeps the cake light and moist, while coconut oil adds gentle richness. Maple sugar gives a soft caramel note that feels perfectly festive.
For the Buttercream Filling
To make the dairy-free buttercream, combine palm shortening, powdered sugar, almond milk, and vanilla. It’s creamy, smooth, and spreads beautifully between the cake layers. The subtle vanilla flavor balances the sweetness of the white chocolate coating.
For the Coating and Decoration
For the coating, melt dairy-free white chocolate chips with a little coconut oil until silky. You’ll also need natural red and green sugar sprinkles for that signature Christmas sparkle.
If you can’t find maple sugar, coconut sugar works too (though it makes the cake slightly darker). Any unsweetened dairy-free milk will work in place of almond milk.
Step-by-Step Instructions
Step 1 – Prepare and Bake the Cake
Preheat your oven to 350°F and line a baking sheet with parchment paper. In a mixing bowl, whisk eggs and maple sugar until frothy. Stir in melted coconut oil, vanilla, and almond milk until smooth.
In another bowl, mix almond flour, tapioca starch, baking powder, baking soda, and salt. Gradually add the dry ingredients to the wet mixture until you have a smooth batter.
Spread the batter evenly onto the prepared baking sheet, forming a thin, level layer. Bake for 12–14 minutes, just until lightly golden and set. Allow it to cool completely before cutting — this helps prevent crumbling.
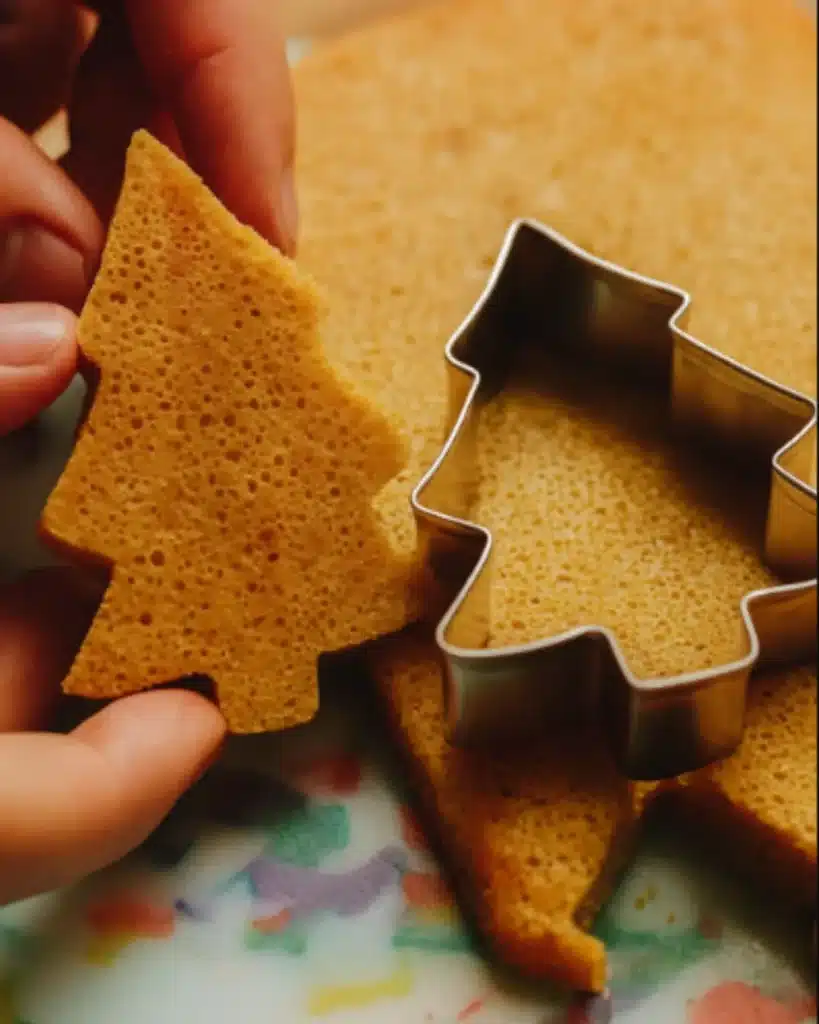
Step 2 – Cut and Assemble the Tree Cakes
Once cooled, use a tree-shaped cookie cutter to cut out even pieces. Pair each tree shape with a matching one for sandwiches.
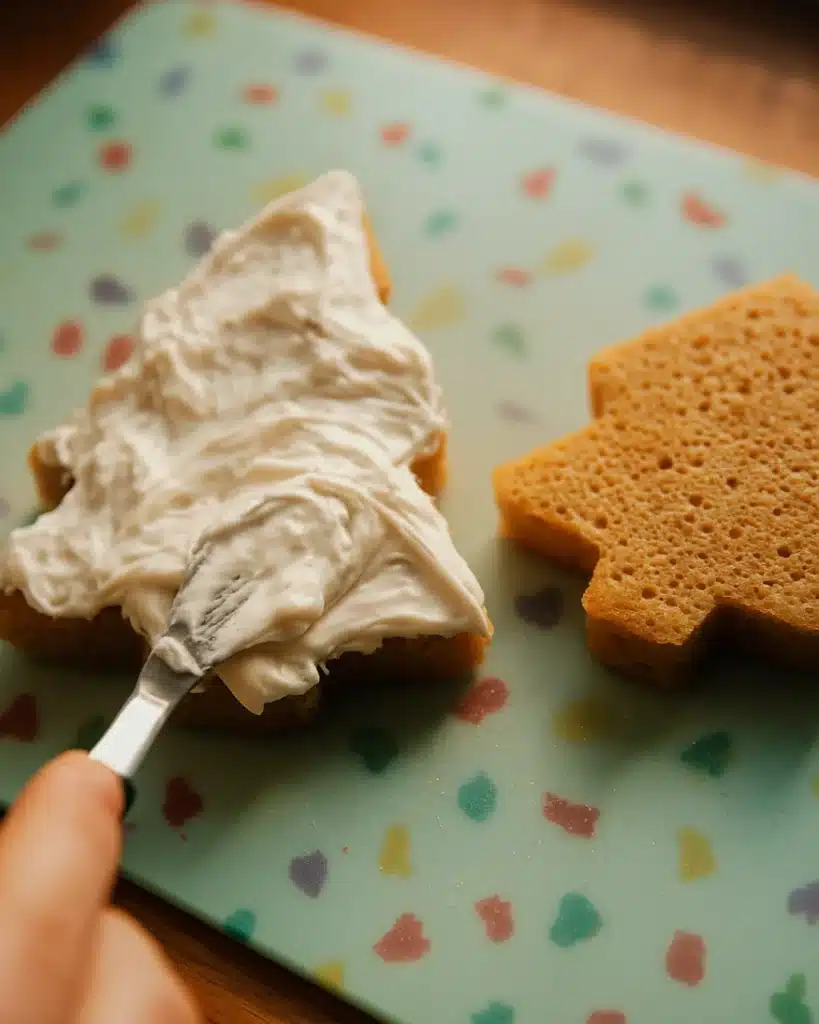
Pipe or spread a layer of buttercream onto one tree, then place the second one on top, gently pressing to form a sandwich. Continue until all cakes are assembled.
Step 3 – Coat and Decorate
Melt the white chocolate chips with coconut oil in short intervals until smooth and glossy. You can either dip each cake into the coating or spoon it over the top, letting it drip slightly down the sides.
While the coating is still soft, quickly sprinkle red and green sugar on top. Work fast — the coating sets quickly as it cools.
Step 4 – Chill and Serve
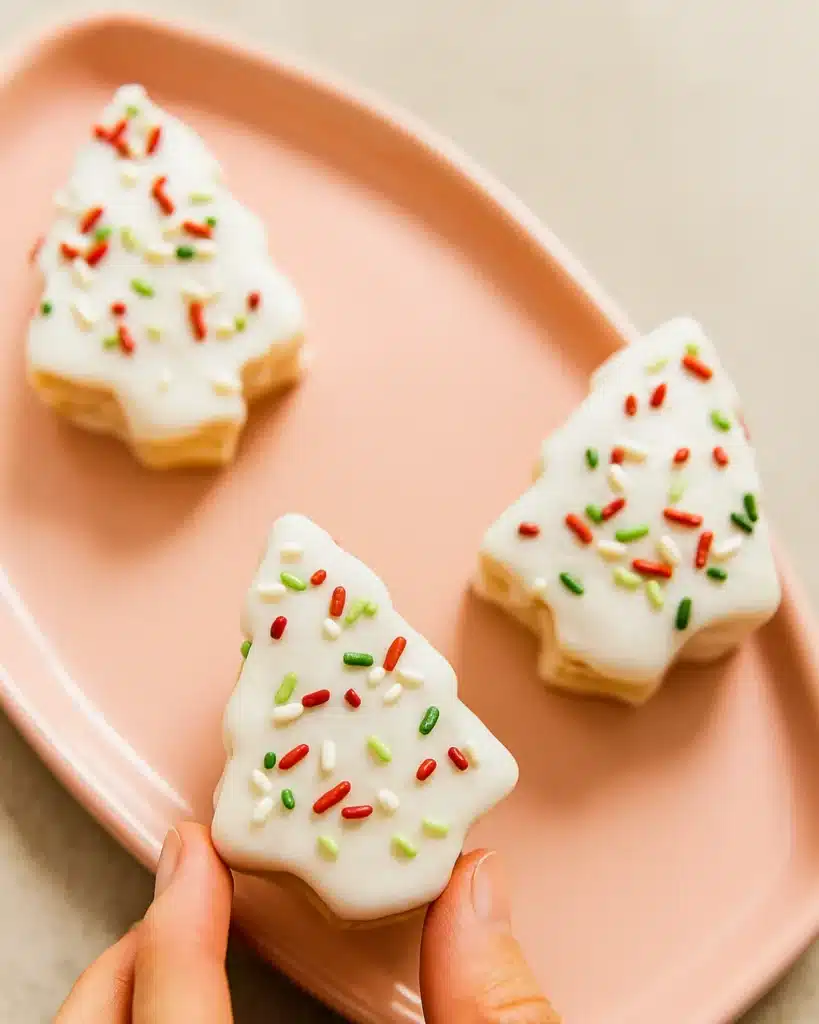
Place the decorated cakes on a tray and chill them in the fridge until the coating hardens completely. Once set, they’re ready to serve. These little trees look lovely on dessert platters or wrapped as edible gifts.
Baking Tips & Tricks
Always use room temperature eggs — they help create a fluffier texture. Let the cake cool fully before cutting so it doesn’t break apart. If the coating thickens as you work, gently reheat it for a few seconds.
Use a small offset spatula or piping bag for neat buttercream layers. For a clean cut, wipe your cookie cutter between each press. When decorating, sprinkle immediately after coating so the colors stick perfectly.
Storage & Freezing Instructions
Store the finished cakes in an airtight container in the refrigerator for up to 4 days. For longer storage, freeze them in layers separated by parchment paper.
When you’re ready to enjoy, thaw them in the fridge overnight or at room temperature for about an hour. The texture may soften slightly, but the flavor stays just as sweet and festive.
Common Questions About Christmas Tree Cakes
How to know when a Christmas cake is ready?
It’s ready when the top looks lightly golden and springs back when touched.
What flavor are Christmas tree cakes?
They taste like classic vanilla cake with a hint of creamy white chocolate.
Why is it called Christmas cake?
The name comes from its holiday shape and traditional festive flavors.
How old are Christmas tree cakes?
The original Little Debbie version has been a holiday favorite since the early 1980s.
Related Recipes to Try
- Little Debbie Christmas Tree Cake Truffles
- Magic Cake Eggnog Christmas Dessert
- Peppermint Pie – Easy Christmas Dessert
- Christmas Cookie Lasagna Dessert
- Christmas Pavlova Trifle – Holiday Dessert
- Festive Chocolate Bites – Easy Christmas Treat
Conclusion
These Christmas Tree Cakes bring joy, nostalgia, and sweetness to any holiday table. They’re soft, creamy, and festive without being overly rich.
Bake them with your kids, gift them to friends, or keep a few chilled for cozy evenings by the fire. Every bite feels like Christmas morning — warm, happy, and full of love.
For more cozy dessert ideas, visit my Pinterest board.
Print
Christmas Tree Cakes (Gluten-Free & Dairy-Free Copycat Recipe)
- Total Time: 1 hour 10–20 minutes
- Yield: 7 to 8 sandwich cakes 1x
Description
Gluten-free, dairy-free Christmas Tree Cakes with soft almond flour sponge, creamy vanilla buttercream, and a crisp white chocolate coating. Nostalgic flavor, fun to decorate, and freezer-friendly.
Ingredients
For the Cake
3 large eggs, room temperature
1/2 cup maple sugar
1/2 cup coconut oil, melted
2 tsp vanilla extract
1/4 cup almond milk
1 1/2 cups almond flour
1/4 cup tapioca starch
1 tsp baking powder
1/4 tsp baking soda
1/4 tsp sea salt
For the Buttercream Filling
1 batch dairy-free buttercream (palm shortening, powdered sugar, almond milk, vanilla)
For the Coating and Decoration
1 batch white chocolate coating (dairy-free white chocolate chips, coconut oil)
Natural red and green sugar sprinkles
Instructions
1. Preheat oven to 350°F and line a baking sheet with parchment paper.
2. Whisk eggs and maple sugar until frothy; stir in melted coconut oil, vanilla, and almond milk.
3. Add almond flour, tapioca starch, baking powder, baking soda, and salt; mix to a smooth batter.
4. Spread batter evenly on the lined sheet to form a thin layer.
5. Bake 12–14 minutes until lightly golden and set; cool completely.
6. Cut out tree shapes with a cookie cutter, pairing them for sandwiches.
7. Pipe buttercream onto one tree and top with a second to form a sandwich.
8. Melt white chocolate with coconut oil until smooth; dip or spoon coating over cakes to cover.
9. Decorate with sprinkles before the coating hardens.
10. Chill to set fully before serving.
Notes
Use room temperature eggs for best mixing results.
Allow cakes to cool before cutting to avoid crumbling.
Work quickly when adding sprinkles as coating sets fast.
Store in the fridge for 3–4 days in an airtight container.
Freezing is possible, but texture may change slightly.
- Prep Time: 25 minutes
- Cook Time: 12–14 minutes
- Category: Christmas Dessert Recipes
- Method: Baking
- Cuisine: American
Nutrition
- Serving Size: 1 cake
- Calories: 394
- Sugar: 20 g
- Fat: 29 g
- Carbohydrates: 29 g
- Fiber: 3 g
- Protein: 6 g