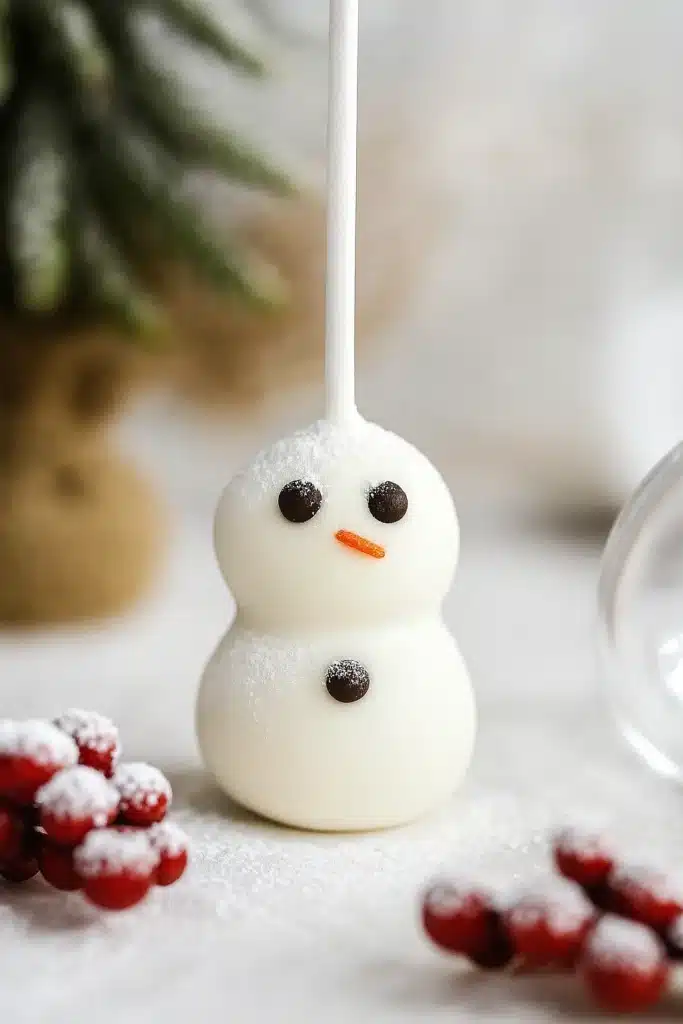
Bring a little magic to your dessert table with these Snowman Cake Pops — adorable, creamy, and dipped in sweet white chocolate. Perfect for gifting, parties, or a cozy night of baking fun!

Table of Contents
Why You’ll Love These Snowman Cake Pops
You’ll love making these Snowman Cake Pops because they’re as fun to decorate as they are to eat. With simple ingredients and minimal prep, they turn a basic cake mix into a cheerful Christmas dessert. Kids can help roll and decorate, while adults will appreciate how festive and freezer-friendly they are. Plus, you can easily swap cake flavors or frostings to match your favorite holiday taste. Whether it’s for a classroom party or a cozy winter get-together, these little snowmen always bring smiles — and plenty of chocolatey joy.
Ingredients You’ll Need
To make these charming Snowman Cake Pops, you’ll need one box of vanilla cake mix, ⅓ cup of vanilla frosting, and a 12 oz bag of white candy melts. Use mini chocolate chips for the eyes and buttons, and orange sprinkles or candy melts for the noses. You’ll also need lollipop sticks for assembling. Feel free to switch things up with red velvet or chocolate cake for a twist. Cream cheese or buttercream frosting also works beautifully.
How to Make Snowman Cake Pops
Step 1 – Bake and Crumble the Cake
Start by baking the cake according to package instructions. Once it’s golden and fluffy, let it cool completely. Then crumble it into fine, even pieces using your hands or a fork. The cooler the cake, the better it holds its shape when mixed with frosting.
Step 2 – Mix and Shape
Next, stir in the frosting until the texture feels dough-like but not sticky. The mix should hold together easily when rolled. Shape into small balls — one larger for the body and a smaller one for the head. Keep sizes consistent so your snowmen stand nicely once assembled.
Step 3 – Chill and Assemble
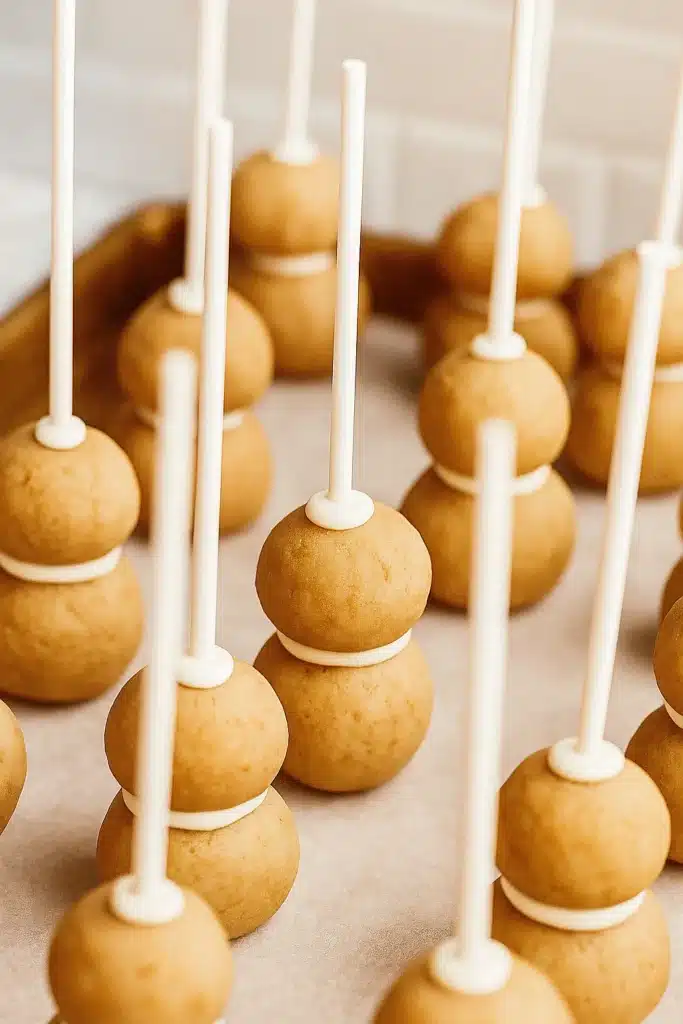
Place the cake balls on a parchment-lined tray and freeze for 20 minutes. Meanwhile, melt a few candy melts and dip one end of each stick into the melted chocolate before inserting it into the smaller “head” ball. This helps secure it. Then attach the larger body ball beneath it. Chill again for another 10 minutes so the structure firms up.
Step 4 – Coat and Decorate
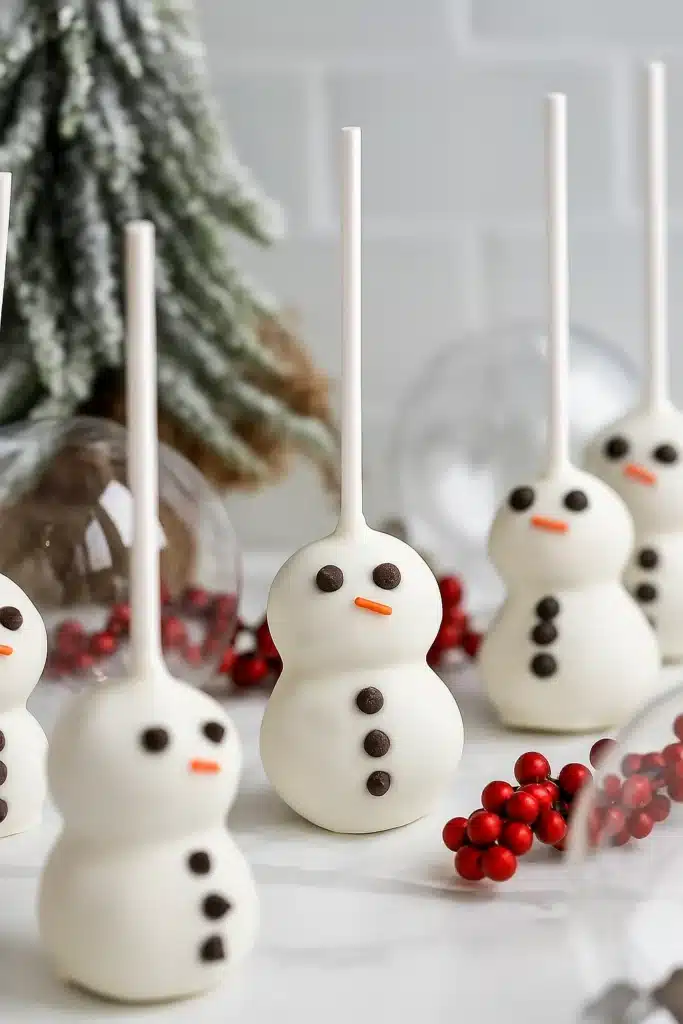
Now melt the remaining candy melts in 30-second microwave bursts until smooth. Dip each snowman carefully, allowing excess coating to drip off. Quickly press in mini chocolate chips for eyes and buttons, and use an orange sprinkle for the nose. You can even add scarves with icing or tiny fondant pieces for a fun touch.
Step 5 – Set and Serve
Place the pops upright in a foam block or cake pop stand to dry. Let them set for 10–15 minutes until the coating is firm. Once ready, they’re perfect for serving or wrapping as homemade Christmas gifts.
Expert Tips for Perfect Snowman Cake Pops
To get that flawless smooth coating, always melt candy melts slowly and stir often. If it thickens, add a teaspoon of coconut oil to thin it. Chilling the cake balls before dipping helps prevent them from falling off the sticks. Work in batches to keep things manageable. For decorations, colored icing, crushed candy canes, or even edible glitter can make your snowmen sparkle. And if you’re short on time, try dipping just one ball and turning it into a cute snowman face instead. These tips guarantee each pop looks bakery-worthy and stays firm through every bite.
Storage and Make-Ahead Instructions
You can store your Snowman Cake Pops at room temperature for up to three days, or refrigerate them for a week. For longer storage, freeze individually wrapped pops in a freezer-safe bag for up to a month. When ready to serve, let them thaw at room temperature for about 30 minutes so they’re soft but still hold their shape. This makes them perfect for holiday prep ahead of time.
FAQs About Snowman Cake Pops
What’s in the Snowman cake pop?
It’s a mix of cake crumbs, frosting, and candy coating, decorated with chocolate chips and sprinkles.
What is the trick to cake pops?
Chilling the shaped balls before dipping is key — it helps them stay on the stick and gives a smoother coating.
How to make marshmallow snowmen?
Stack marshmallows on a stick, decorate with icing or candy, and add mini chocolate chips for the face and buttons.
Why are they called cake pops?
Because they’re cake shaped into small balls, placed on sticks, and dipped like lollipops!
Related Recipes to Try
- Adorable Strawberry Santas
- Homemade Torrone Christmas Nougat
- Festive Christmas Tree Cupcakes
- Creamy and Cheerful Christmas Peppermint Pie
- Fun Reindeer Chow Snack Mix
- Cheerful Snowmen Truffles
Conclusion
These Snowman Cake Pops are more than just a dessert — they’re little edible snowmen that bring holiday magic to your table. With simple ingredients and endless decoration options, they’re perfect for both kids and grown-ups. Make them ahead for parties or wrap them for gifts — either way, they’ll melt hearts faster than snowflakes in cocoa. Find even more cozy baking inspiration on Pinterest.
Print
Snowman Cake Pops (Fun and Easy Christmas Treats)
- Total Time: 1 hour 40 minutes
- Yield: 19 cake pops 1x
- Diet: Vegetarian
Description
Fun, creamy, and festive Snowman Cake Pops made with vanilla cake, frosting, and white candy melts — perfect for Christmas parties, gifts, or kids’ treats!
Ingredients
1 box vanilla cake mix
⅓ cup vanilla frosting
1 bag (12 oz) white candy melts
Mini chocolate chips (for eyes and buttons)
Orange sprinkles or orange candy melts (for noses)
Lollipop or cake pop sticks
Instructions
1. Bake the cake as directed on the package and cool completely.
2. Crumble the cake into a bowl and mix in the frosting until it forms a dough-like texture.
3. Shape into balls — one large for the body, one small for the head.
4. Freeze for 20 minutes until firm.
5. Melt white candy melts in 30-second microwave intervals until smooth.
6. Dip a lollipop stick into melted chocolate, insert it into the smaller ball, and attach the larger ball below it to form a snowman.
7. Freeze again for 10 minutes.
8. Coat each snowman in melted candy, letting the excess drip off.
9. Press chocolate chips for eyes and buttons, and an orange sprinkle for the nose while still wet.
10. Let them set upright for 10–15 minutes before serving or wrapping.
Notes
Chill shaped cake balls before coating for easier dipping.
Melt candy melts slowly and add a bit of coconut oil if needed to thin.
Decorate with colored icing, sprinkles, or mini candies for extra fun.
Store in airtight containers to keep fresh.
- Prep Time: 1 hour
- Cook Time: 40 minutes
- Category: Christmas Dessert Recipes
- Method: No-Bake / Dipped
- Cuisine: American
Nutrition
- Serving Size: 1 cake pop
- Calories: 250
- Sugar: 33g
- Sodium: 219mg
- Fat: 5g
- Saturated Fat: 2g
- Unsaturated Fat: 2g
- Trans Fat: 0g
- Carbohydrates: 52g
- Fiber: 1g
- Protein: 2g
- Cholesterol: 0mg