These Witch Hat Cookies are the ultimate Halloween treat — chewy peanut butter cookies coated in sparkly sugar and topped with a chocolate kiss. Perfect for spooky parties or a cozy night in!

Table of Contents
Why You’ll Love This Recipe
These Witch Hat Cookies are fun, festive, and absolutely simple to make. You only need basic pantry ingredients, and the steps are easy enough for kids to help with. The dough mixes up in minutes, chills for structure, and bakes into soft, chewy cookies with a perfect crackly top. Once cooled, you press in a Hershey’s Kiss to create the cute “witch hat” look.
They’re ideal for Halloween parties because you can make them ahead and freeze them without losing texture. Plus, you can easily switch up colors or sprinkles to match any spooky theme. The soft peanut butter base pairs beautifully with the smooth chocolate center, creating that irresistible combo everyone loves.
If you enjoy themed recipes like the Halloween ghost pizza recipe, you’ll adore how these cookies bring playful magic to your dessert table.
Ingredients You’ll Need

Dry Ingredients
You’ll need all-purpose flour for structure, cornstarch for softness, baking soda and baking powder for lift, and a touch of fine sea salt to balance sweetness.
Wet Ingredients
Softened unsalted butter and granulated sugar make the base light and fluffy. The egg binds everything together, while creamy peanut butter and vanilla extract bring rich flavor and aroma. Add purple gel food coloring for that eye-catching Halloween vibe.
Decorating Ingredients
Use Halloween sprinkles or purple sanding sugar for sparkle, and top each cookie with a Hershey’s Kiss or Hug for the signature witch hat tip.
How to Make Witch Hat Cookies Step by Step
Prepare the Dough

Mix flour, cornstarch, baking soda, baking powder, and salt in one bowl. In another, beat butter and sugar until fluffy. Add the egg, peanut butter, and vanilla, then blend until smooth. Gradually stir in the dry ingredients. Tint the dough with purple gel coloring until you get your desired shade.
Chill for Best Results
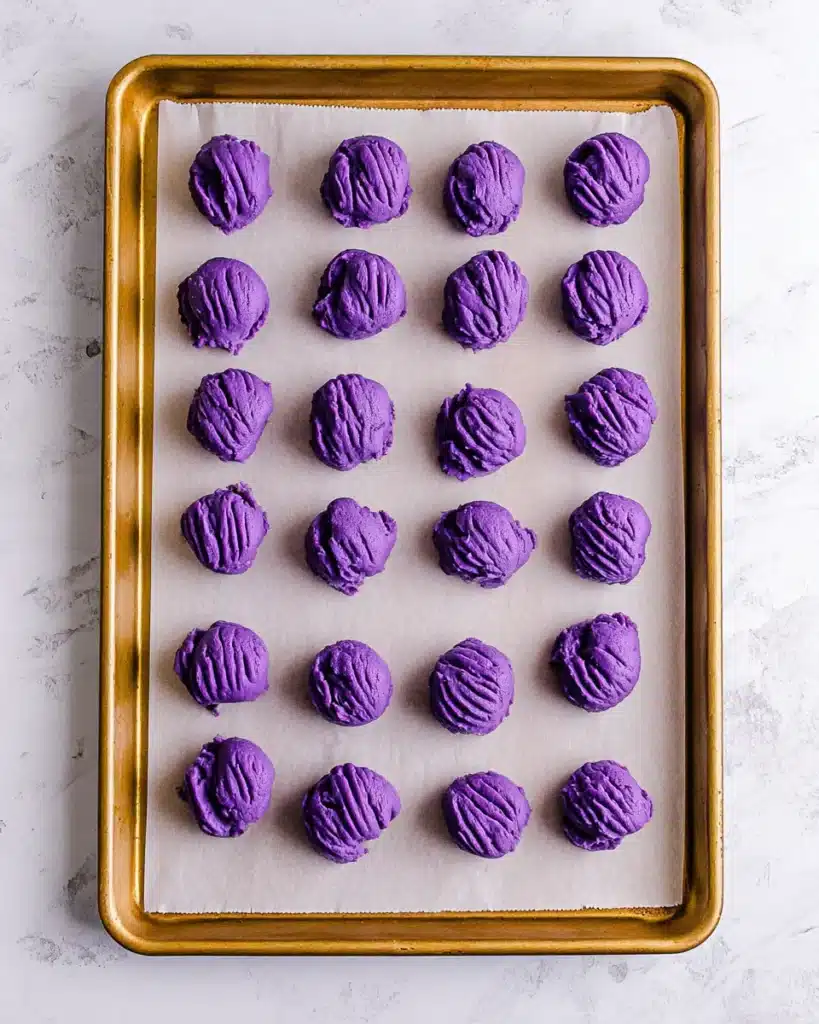
Scoop one-tablespoon dough balls, place them on a tray, and chill for at least two hours. This step keeps your cookies thick and chewy instead of spreading flat.
Bake the Cookies

Preheat your oven to 350°F. Roll chilled dough in sprinkles or sanding sugar. Arrange on a baking sheet about two inches apart. Bake for 9–11 minutes until puffed and cracked on top. Let cookies rest for five minutes on the tray.
Add the “Witch Hat” Topping

While cookies are still warm, press a chocolate kiss into the center of each one. Then, immediately place the tray in the freezer for ten minutes to keep the chocolate from melting. Cool completely before serving or storing.
Recipe Tips & Tricks
Always use gel food coloring instead of liquid to avoid changing the dough texture. Also, remember to bring your butter and egg to room temperature for smoother mixing. Chilling the dough is key for that soft, thick center.
After baking, quickly press in the Hershey’s Kiss and freeze to preserve its perfect shape. If sprinkles don’t stick well, try rolling in sanding sugar instead. Finally, handle the cookies gently while warm — they’ll firm up as they cool. These small steps make your cookies bakery-level beautiful and irresistibly chewy.
Variations & Substitutions
Switch the color of the dough for different holidays — think orange for fall or green for Christmas. Try different Hershey’s Kiss flavors like dark chocolate or caramel for fun twists.
You can also mix in mini chocolate chips or swap sprinkles for sanding sugar for a smoother finish. If you’re out of unsalted butter, use salted butter but skip the extra salt in the recipe.
For a Halloween dessert spread, pair these with Mummy brownies – fun Halloween treats or Black velvet Halloween cake for a full spooky lineup.
Storage & Make-Ahead Guide
Store Witch Hat Cookies in an airtight container at room temperature for up to five days. To freeze, layer them between parchment in a freezer-safe bag for up to two months.
You can also make the dough the day before and chill it overnight for easier baking. When ready, just roll, bake, and decorate — no need to let the dough warm up first. These cookies keep their chewy texture beautifully even after freezing.
Serving Suggestions
Serve Witch Hat Cookies at Halloween parties alongside mugs of hot cocoa or apple cider. They also make adorable lunchbox treats or festive gifts in clear bags tied with ribbon.
Arrange them on a Halloween-themed dessert table next to Cheeseburger skulls Halloween recipe or Halloween vampire bite cupcakes for a complete spooky spread.
Related Recipes to Try
- Spooky ghost brown butter pumpkin cookies
- Black velvet Halloween cake
- Halloween ghost pizza recipe
- Mummy brownies – fun Halloween treats
Conclusion
These Witch Hat Cookies are spooky, sweet, and incredibly fun to make. They’re perfect for Halloween gatherings, kids’ bake days, or cozy October nights. The best part is how simple they are — just mix, chill, bake, and decorate.
Grab your favorite sprinkles, turn on a Halloween playlist, and enjoy the magic of baking these adorable treats. For more festive ideas, check out my Pinterest board filled with cozy seasonal desserts.
Print
Witch Hat Cookies
- Total Time: 2 hours 25 minutes
- Yield: 33 cookies 1x
- Diet: Vegetarian
Description
Soft, chewy Witch Hat Cookies with sparkly purple sugar and a chocolate kiss on top — festive, kid-friendly, and perfect for Halloween parties or make-ahead treats.
Ingredients
1½ cups all-purpose flour
2 teaspoons cornstarch
½ teaspoon baking soda
¼ teaspoon baking powder
⅛ teaspoon fine sea salt
½ cup unsalted butter, softened
1 cup granulated sugar
1 large egg
¾ cup creamy peanut butter
1 teaspoon vanilla extract
Purple gel food coloring
Halloween sprinkles or purple sanding sugar
33 Hershey’s Kisses or Hugs candies, unwrapped
Instructions
1. Whisk flour, cornstarch, baking soda, baking powder, and salt together.
2. Beat butter and sugar until fluffy. Add egg; beat again.
3. Mix in peanut butter and vanilla until smooth.
4. Add dry ingredients; stir to form a dough. Tint with purple gel coloring.
5. Scoop 1-tablespoon portions onto a lined tray. Cover and chill at least 2 hours or overnight.
6. Preheat oven to 350°F.
7. Roll chilled dough balls in sprinkles or sanding sugar. Place 2 inches apart on a baking sheet.
8. Bake 9–11 minutes until puffed and cracked.
9. Cool on the tray for 5 minutes.
10. Press a chocolate kiss into the center of each cookie.
11. Immediately place the tray in the freezer for 10 minutes to set the chocolate.
12. Cool completely before serving.
Notes
Use only gel food coloring to avoid altering dough texture.
Bring butter and egg to room temperature for smooth mixing.
Always chill dough to prevent spreading and keep the witch hat shape.
If sprinkles don’t stick well, roll in sanding sugar instead.
Freeze the tray right after adding the candy to prevent melting.
- Prep Time: 15 minutes
- Cook Time: 10 minutes
- Category: Halloween Recipes
- Method: Baking
- Cuisine: American
Nutrition
- Serving Size: 1 cookie
- Calories: 129
- Sugar: 9
- Sodium: 60
- Fat: 7
- Saturated Fat: 3
- Unsaturated Fat: 3
- Trans Fat: 0.1
- Carbohydrates: 15
- Fiber: 1
- Protein: 2
- Cholesterol: 14